# Import a library of functions called 'pygame'
import pygame
# Initialize the game engine
pygame.init()
# Define some colors
BLACK = (0, 0, 0)
WHITE = (255, 255, 255)
BLUE = (0, 0, 255)
GREEN = (0, 255, 0)
RED = (255, 0, 0)
PI = 3.141592653
# Set the height and width of the screen
#size = (400, 500)
size = (500, 700)
screen = pygame.display.set_mode(size)
pygame.display.set_caption("Professor Craven's Cool Game")
# Loop until the user clicks the close button.
done = False
clock = pygame.time.Clock()
# Loop as long as done == False
while not done:
for event in pygame.event.get(): # User did something
if event.type == pygame.QUIT: # If user clicked close
done = True # Flag that we are done so we exit this loop
# All drawing code happens after the for loop and but
# inside the main while not done loop.
# Clear the screen and set the screen background
screen.fill(WHITE)
# Draw on the screen a line from (0,0) to (100,100)
# 5 pixels wide.
pygame.draw.line(screen, GREEN, [0, 0], [100, 100], 5)
pygame.draw.line(screen, GREEN, [0, 0], [100, 100], 10)
# Draw on the screen several lines from (0,10) to (100,110)
# 5 pixels wide using a loop
for y_offset in range(0, 100, 10):
pygame.draw.line(screen, RED, [0, 10 + y_offset], [100, 110 + y_offset], 5)
# Draw a rectangle
pygame.draw.rect(screen, BLACK, [20, 20, 250, 100], 2)
# Draw an ellipse, using a rectangle as the outside boundaries
pygame.draw.ellipse(screen, BLACK, [20, 20, 250, 100], 2)
# Draw an arc as part of an ellipse.
# Use radians to determine what angle to draw.
pygame.draw.arc(screen, BLACK, [20, 220, 250, 200], 0, PI / 2, 2)
pygame.draw.arc(screen, GREEN, [20, 220, 250, 200], PI / 2, PI, 2)
pygame.draw.arc(screen, BLUE, [20, 220, 250, 200], PI, 3 * PI / 2, 2)
pygame.draw.arc(screen, RED, [20, 220, 250, 200], 3 * PI / 2, 2 * PI, 2)
# This draws a triangle using the polygon command
pygame.draw.polygon(screen, BLACK, [[100, 100], [0, 200], [200, 200]], 5)
# Select the font to use, size, bold, italics
font = pygame.font.SysFont('Calibri', 25, True, False)
# Render the text. "True" means anti-aliased text.
# Black is the color. This creates an image of the
# letters, but does not put it on the screen
text = font.render("ANIL DURGAM", True, BLACK)
# Put the image of the text on the screen at 250x250
screen.blit(text, [90, 300])
# Go ahead and update the screen with what we've drawn.
# This MUST happen after all the other drawing commands.
pygame.display.flip()
# This limits the while loop to a max of 60 times per second.
# Leave this out and we will use all CPU we can.
clock.tick(60)
# Be IDLE friendly
pygame.quit()
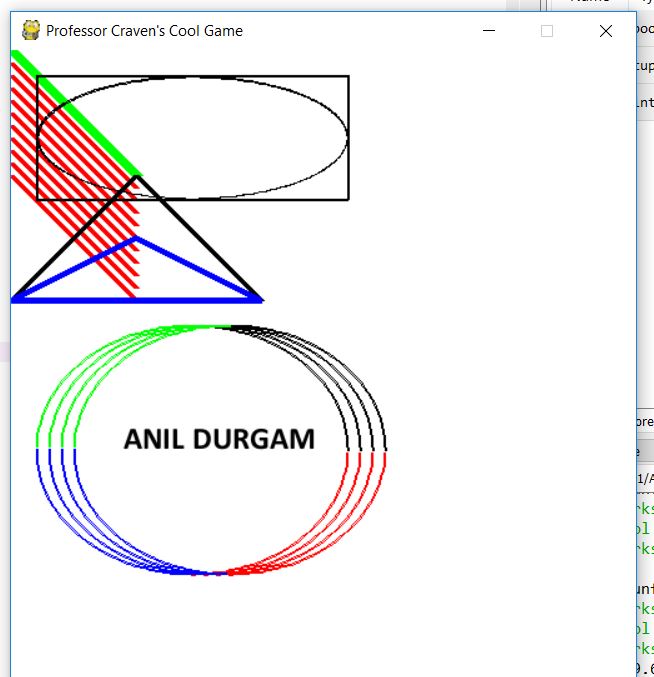
example 2:
# Import a library of functions called 'pygame'
import pygame
# Initialize the game engine
pygame.init()
# Define some colors
BLACK = (0, 0, 0)
WHITE = (255, 255, 255)
BLUE = (0, 0, 255)
GREEN = (0, 255, 0)
RED = (255, 0, 0)
PI = 3.141592653
# Set the height and width of the screen
#size = (400, 500)
size = (500, 700)
screen = pygame.display.set_mode(size)
pygame.display.set_caption("Professor Craven's Cool Game")
# Loop until the user clicks the close button.
done = False
clock = pygame.time.Clock()
# Loop as long as done == False
while not done:
for event in pygame.event.get(): # User did something
if event.type == pygame.QUIT: # If user clicked close
done = True # Flag that we are done so we exit this loop
# All drawing code happens after the for loop and but
# inside the main while not done loop.
# Clear the screen and set the screen background
screen.fill(WHITE)
# Draw on the screen a line from (0,0) to (100,100)
# 5 pixels wide.
pygame.draw.line(screen, GREEN, [0, 0], [100, 100], 5)
pygame.draw.line(screen, GREEN, [0, 0], [100, 100], 10)
# Draw on the screen several lines from (0,10) to (100,110)
# 5 pixels wide using a loop
for y_offset in range(0, 100, 10):
pygame.draw.line(screen, RED, [0, 10 + y_offset], [100, 110 + y_offset], 5)
# Draw a rectangle
pygame.draw.rect(screen, BLACK, [20, 20, 250, 100], 2)
# Draw an ellipse, using a rectangle as the outside boundaries
pygame.draw.ellipse(screen, BLACK, [20, 20, 250, 100], 2)
# Draw an arc as part of an ellipse.
# Use radians to determine what angle to draw.
pygame.draw.arc(screen, BLACK, [20, 220, 250, 200], 0, PI / 2, 2)
pygame.draw.arc(screen, GREEN, [20, 220, 250, 200], PI / 2, PI, 2)
pygame.draw.arc(screen, BLUE, [20, 220, 250, 200], PI, 3 * PI / 2, 2)
pygame.draw.arc(screen, RED, [20, 220, 250, 200], 3 * PI / 2, 2 * PI, 2)
##
##
pygame.draw.arc(screen, BLACK, [30, 220, 250, 200], 0, PI / 2, 2)
pygame.draw.arc(screen, GREEN, [30, 220, 250, 200], PI / 2, PI, 2)
pygame.draw.arc(screen, BLUE, [30, 220, 250, 200], PI, 3 * PI / 2, 2)
pygame.draw.arc(screen, RED, [30, 220, 250, 200], 3 * PI / 2, 2 * PI, 2)
##
##
pygame.draw.arc(screen, BLACK, [40, 220, 250, 200], 0, PI / 2, 2)
pygame.draw.arc(screen, GREEN, [40, 220, 250, 200], PI / 2, PI, 2)
pygame.draw.arc(screen, BLUE, [40, 220, 250, 200], PI, 3 * PI / 2, 2)
pygame.draw.arc(screen, RED, [40, 220, 250, 200], 3 * PI / 2, 2 * PI, 2)
##
##
pygame.draw.arc(screen, BLACK, [50, 220, 250, 200], 0, PI / 2, 2)
pygame.draw.arc(screen, GREEN, [50, 220, 250, 200], PI / 2, PI, 2)
pygame.draw.arc(screen, BLUE, [50, 220, 250, 200], PI, 3 * PI / 2, 2)
pygame.draw.arc(screen, RED, [50, 220, 250, 200], 3 * PI / 2, 2 * PI, 2)
# This draws a triangle using the polygon command
pygame.draw.polygon(screen, BLACK, [[100, 100], [0, 200], [200, 200]], 5)
# This draws a triangle using the polygon command
pygame.draw.polygon(screen, BLUE, [[100, 150], [0, 200], [200, 200]], 5)
#pygame.draw.circle()
# Select the font to use, size, bold, italics
font = pygame.font.SysFont('Calibri', 25, True, False)
# Render the text. "True" means anti-aliased text.
# Black is the color. This creates an image of the
# letters, but does not put it on the screen
text = font.render("ANIL DURGAM", True, BLACK)
# Put the image of the text on the screen at 250x250
screen.blit(text, [90, 300])
# Go ahead and update the screen with what we've drawn.
# This MUST happen after all the other drawing commands.
pygame.display.flip()
# This limits the while loop to a max of 60 times per second.
# Leave this out and we will use all CPU we can.
clock.tick(60)
# Be IDLE friendly
pygame.quit()