Thursday, December 3, 2020

python day4,variable types,print formats

 variable

=====================
1.a,b,c,d------allowed
2. total,subtotal,grandtotal-----allowed
3.total1,key1,key2354 -----allowed
4.grand_total,coaching_center, cinema_theatre,s_s_rajamouli,SSRajamouli,CinemaTheatre---allowed
5.ca$h---not allowed
6._mode---allowed
7._ab_abc_abcd---allowed

sep in print:
===============
print("this is praveen","this is testing",sep="------")

output:
this is praveen------this is testing

format in print
==================
print("My name is {firstname}, I'm {age}".format(firstname = "praveen", age = 36))
print("My name is {0}, I'm {1},totals {2}".format("praveen",36,24.56))
print("My name is {0}, I'm {1},totals {total}".format("praveen",36,total=24.56))


if and else:
========================
condition true if statements prints
condition false then else statement prints

a=0
if a==1:
print("we will go movies")
else :
print("indendation is also working fine")

print("second friend sit in home")


ex2:
a="test"
if a=="test":
print("this is if loop")
print("we will go movies")
else :
print("this is else loop")

print("second friend sit in home")

example3:
a=4
budget=1
alcohal=1
beach=2
if a==4:
if budget==1:
if alcohal==1:
print("we will drink")

if beach==1:
print("beach is empty")
else:
print("beach is very busy")

else:
print
else:
print("no goa sorry")

else :
print("this is else loop")

print("second friend sit in home")


Multiple data bases support in SQLITE3

 DATABASES = {

    'default': {
        'ENGINE': 'django.db.backends.sqlite3', 
        'NAME': os.path.join(DIR, 'django.sqlite3'),
        'USER': '',
        'PASSWORD': '',
        'HOST': '',
        'PORT': '',
    },
    'anil': { # this is our sample db, already created
        'ENGINE': 'django.db.backends.sqlite3',
        'NAME': os.path.join(DIR, 'anil_Sqlite.sqlite'),
        'USER': '',
        'PASSWORD': '',
        'HOST': '',
        'PORT': '',
    }
}

Wednesday, November 18, 2020

password checking code in python and django

 password_check1="Anil@123"

password_check2=[]

#i=password_check1.capitalize()


if len(password_check1)>=8:

    if password_check1[0].isupper()==True:

        if password_check1.isspace()==False:

            lookingfor = "@"

            for c in range(0, len(password_check1)):

                if password_check1[c] == lookingfor:

                    pass

                    #print("given characteris there in",password_check1)

            for word in password_check1.split():

                if word.isdigit():

                    password_check2.append(int(word))

                    print(password_check2)

                else:

                    print("no digits")

        else:

            print("dnot give spaces")

    else :

        print("first letter should be capital")


else :

    print("password should be min 8 letter")

MM32F003TW SWDIO as GPIO working code


MM32F003TW SWDIO as GPIO working code

please download  by clicking below link


Download

MM32F003TW with PWM working code


please click below to download the code.

in this PWM technique used to reduce the LED brighness


Download

Tuesday, November 3, 2020

RFM98w with arudino libraries


please click below link to download the file

click here

https://drive.google.com/file/d/19DJQqx37YO6oVXPzKPpfdEzZ7Q1Vk0ij/view?usp=sharing

Wednesday, October 28, 2020

import * working method


create a file on student.py

========================


class Person:

  def __init__(self, name, age):

    self.name = name

    self.age = age


def anil_test(i):

    print("this is working"+i)


create another file test.py

======================

#from student import anil_test,Person

from student import *


anil_test("anil")

p1 = Person("John", 36)


print(p1.name)

print(p1.age)


Django models test

 Django models test...

======================

.in models.py file

class student(models.Model):

    student_sno = models.IntegerField();

    student_name = models.CharField(max_length=256);

    student_father_name= models.CharField(max_length=256);


class student_class(models.Model):

    student = models.ForeignKey(student,on_delete=models.CASCADE) 


python manage.py makemigrations your_app


python manage.py sqlmigrate your_app 0001


python manage.py migrate


python .\manage.py shell


in db shell

=====================

from chess2.models import student, student_class

Django html tags display

 Django html tags display:

========================

By writing html tags you can achieve the output 


go into views.py file


def menu(request):

    return HttpResponse("<h1>This is working menu</h1>");

django installation process

 django installation process:

=============================


pip install virtualenvwrapper-win

mkvirtualenv test

pip install django


django-admin --version


mkdir yourfolder


cd yourfolder


django-admin startproject yourprojectname


python manage.py runserver


to create virtual environment in vscode:

=======================================

workon "base"


python manage.py startapp yourapp


creating your app:

=======================

create urls.py in your app


urlpatterns=[

path('',views.home,name='home')

]


go into views.py

add :from django.http import HttpResponse


create a function home


def home(request):

return HttpResponse("we are into our own page");


go into urls project:

add below line


path('',include('yourapp.urls'))


Thursday, October 22, 2020

AT


AT commands testing on ESP32-WROOM-32

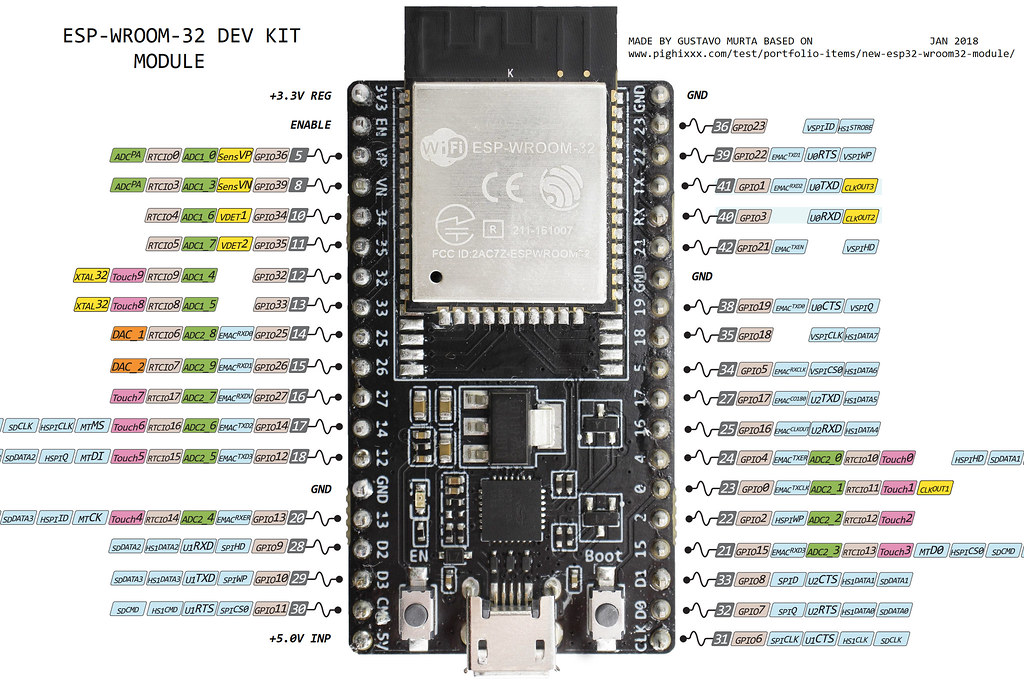
ESP32-WROOM-32 PINOUT DIAGRAM


ESP32-WROOM-32 - ESP32-WROOM-32 module soldered to the development board. Optionally ESP32-WROOM-32D, ESP32-WROOM-32U or ESP32-SOLO-1 module may be soldered instead of the ESP32-WROOM-32.

USB-UART Bridge - A single chip USB-UART bridge provides up to 3 Mbps transfers rates.

BOOT button - Download button: holding down the Boot button and pressing the EN button initiates the firmware download mode. Then user can download firmware through the serial port.

EN button - Reset button: pressing this button resets the system.

Micro USB Port - USB interface. It functions as the power supply for the board and the communication interface between PC and the ESP module.

TX0, TX2 - transmit pin. GPIO pin

RX0, RX2  - receive pin.  GPIO pin

3V3 (or 3V or 3.3V) - power supply pin (3-3.6V). 

GND - ground pin.

EN - Chip enable. Keep it on high (3.3V) for normal operation.

Vin - External power supply 5VDC.

1.   Uploading AT firmware/Firmware upgrade

CONNECTIONS :

·       Attach USB cable one side to ESP32-WROOM-32

·       Connect the another end PC/LAPTOP


Shown below


2. Using USB to TTL converter for AT communication


ESP32-WROOM-32 firmware versions


ESP32-WROOM-32 AT Bin V1.1.1 2018.07.11

ESP32-WROOM-32 AT Bin V1.1 2018.06.13

ESP32-WROOM-32 AT Bin V1.0 2017.11.17

ESP32-WROOM-32 AT Bin V0.10 2017.06.14


1.     Do wiring for uploading AT firmware/firmware update.

2.     Download Flash Download Tools (ESP8266 & ESP32) from espressif.com.  

The ESP32 Flash Download Tool, just like the ESP8266 download tool, is the official Espressif Download tool that runs on Windows platform. The tool can be used to modify and generate init BINs, generate consolidated BIN files or program multiple chips for production runs.

The tool uses COM port to send BIN files from PC to the ESP32, which then flashes the data to the primary flash chip.

The ESP32 Flash Download Tool, just like the ESP8266 download tool, is the official Espressif Download tool that runs on Windows platform. The tool can be used to modify and generate init BINs, generate consolidated BIN files or program multiple chips for production runs.
The tool uses COM port to send BIN files from PC to the ESP32, which then flashes the data to the primary flash chip.

3.     Download and unzip the latest AT firmware for your module (Check which module you have, for example we have ESP32-WROOM-32). We used this firmware here: ESP32-WROOM-32 AT Bin V1.1.1 2018.07.11

4.     Go to the folder ESP32-WROOM-32_AT_V1.1.1 and find file named download.config


  • You can open it with Notepad program. This file has configuration for ESP32 download tool: --flash_mode dio --flash_freq 40m --flash_size detect 0x1000 bootloader/bootloader.bin 0x20000 at_customize.bin 0x21000 customized_partitions/ble_data.bin 0x24000 customized_partitions/server_cert.bin 0x26000 customized_partitions/server_key.bin 0x28000 customized_partitions/server_ca.bin 0x2a000 customized_partitions/client_cert.bin 0x2c000 customized_partitions/client_key.bin 0x2e000 customized_partitions/client_ca.bin 0xf000 phy_init_data.bin 0x100000 esp-at.bin 0x8000 partitions_at.bin.
  • You will need to upload 9 files to your ESP32 development board: 0x1000 bootloader/bootloader.bin 0x20000 at_customize.bin 0x21000 customized_partitions/ble_data.bin 0x24000 customized_partitions/server_cert.bin 0x26000 customized_partitions/server_key.bin 0x28000 customized_partitions/server_ca.bin 0xf000 phy_init_data.bin 0x100000 esp-at.bin 0x8000 partitions_at.bin
  • Unzip, open FLASH_DOWNLOAD_TOOLS_V3.6.4 folder and double-click on ESPFlashDownloadTool_v3.6.4.exe
  • Click on ESP32 DownloadTool button. Select SPIDownload tab. Set configuration as shown below:


AT commands firmware for memory locations

1. bootloader.bin:0x1000

2. at_customize.bin:0x20000

3. server_cert.bin:0x24000

4. server_key.bin:0x26000

5. server_ca.bin:0x28000

6. client_cert.bin:0x2a000

7. client_key.bin:0x2c000

8. client_ca.bin:0x2e000

9. phy_init_data.bin:0xf000

10. esp-at.bin:0x100000

11. partitions_at.bin:0x8000


Download tool


After flashing the firmware


To communicate (use AT commands) with ESP32 development board you need USB to TTL converter. 

For using this USB to UART Converter you need a software tool. You can use different software tools: TerminalUSR-TCP232-Test V1.4AiThinker_Serial_Tool_V1.2.3cooltermsscom3.2 , KiTTYputty,tera termAccess port and so on. We recommend you to use AiThinker_Serial_Tool_V1.2.3 or sscom3.2, as you can save your AT commands and it's very easy to use.

  • Do wiring for using USB to TTL converter for AT communication.
  • Plug your USB to TTL converter into your PC USB port. Download and install drivers. See more info here.
  • Download and install software tool. We will use AiThinker_Serial_Tool_V1.2.3 here.
  • Set the baud rate 115200, data bits 8, parity bits none,stop bits one.
  • Click on Open Serial button.


Results

ESP32-wroom-32-at-output.JPG

  • First you need to check if AT commands are working - enter “AT” and press  Send button.This would print "OK" which signifies of working connection and operation of the module.
  • Requests TA revision identification. Enter "AT+GMR" and press Send button.
  • For other AT commands see list here.
 

python class topic video